Making a "Dumb Terminal" Out of Trash
Why would anyone want to do this?
Because it’s fun!
It can also be useful. A few months ago, my home server started sending me emails letting me know that it spontaneously rebooted overnight. After checking the UPS and power supply, I started running out of ideas. What I needed was some way to catch the computer in the act of crashing. That’s when I remembered that my server has a nice old-fashioned serial port. If the crash was due to a kernel panic, I might be able to find some clues if it would dump a stack trace before restarting. Or, I could leave it frozen at crash time and debug it over serial console.
I could also use the same equipment as a terminal server, allowing my retrocomputers to connect to a modern-ish Linux system.
The equipment
A dumb terminal of years gone by would be essentially a display, a keyboard, a serial port, and some minimal hardware and software to make it all work. You could expect a crisp, high resolution monochrome CRT display, and a true mechanical keyboard. And because these were meant for the business sector, you’d expect solid construction. That’s…not exactly what we’re going to be using.
OK, this isn’t exactly trash. For me, a lot of these components were thrifted or were just sitting in my basement from past projects. You will likely need to buy some of these components or substitutes.
A Raspberry Pi
I am using an original Raspberry Pi Model B from 2012. It is way too slow for many purposes, but a dumb terminal is dumb – it doesn’t need to do much computation at all.
Any SD card
Truly any SD card will work, as long as it works with the Pi. I am using a very old SD card from a digital camera. Updating the system will take a very long time, but a dumb terminal’s typical workload does not involve a lot of disk I/O.
A USB to serial adapter
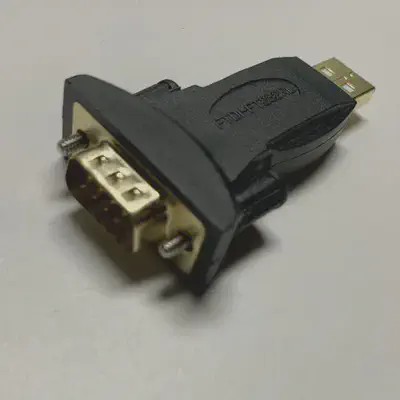
A null modem connector
If you connect a serial cable directly between two computers (rather than to a separate device, like a dial-up modem), the transmit line from one device will be connected to the transmit line of the other, rather than the receive line. This prevents the devices from communicating. A null modem adapter will connect the transmit line to the receive line (as well as the various pins used for handshaking). It functions similarly to an Ethernet crossover cable.
Using a USB to serial adapter is convenient, but some people prefer to connect the GPIO pins on the Raspberry Pi to a serial connector. You will need to buy or build a level shifter circuit in this instance to adjust the ±5 volts required by the RS-232 serial standard for serial communication to the ±3.3 volts that the Pi’s GPIO pins can tolerate.
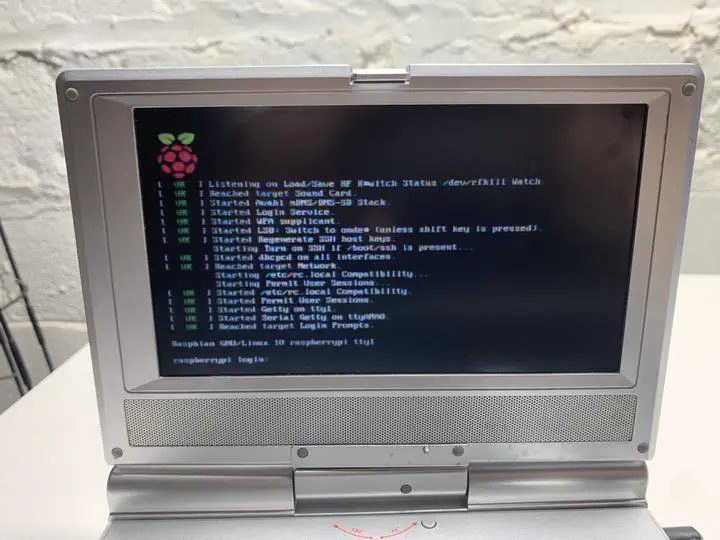
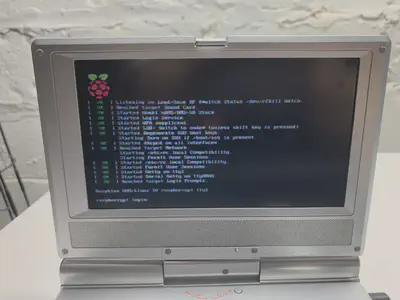
A portable DVD player (optional)
It is a little painful to read text on this thing. On the plus side, it cost $6 from a thrift shop, it’s in color, and it’s easy to carry wherever I need it.
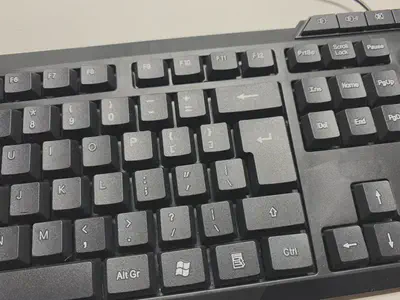
A budget keyboard (optional)
Forget the membrane keyboard that came with the last PC you bought. This is about half the weight. The keys pop off if you drop it from a height of 6 inches. On the plus side, it was under $5 at a thrift shop.
Preparing the Pi
I used the Raspberry Pi OS for this project. Many other Pi-based distros have ended their support for the original Pi, but at the time of writing you can still run the latest Raspberry Pi OS on any Raspberry Pi model. Nice! I used the “Raspberry Pi OS Lite” version because I did not want to install a full desktop environment on the Pi.
You can prepare the SD card according to the official instructions, set a password for the default pi user and enable SSH. Running sudo raspi-config is a convenient way to do this. You can also take this time to further secure the system by configuring unattended upgrades, setting up a firewall, or whatever else you like.
Identify the serial device
If you’re using a USB serial adapter, there’s a good chance your device is /dev/ttyUSB0. You can list the contents of /dev/serial to locate your device. This will be a symbolic link to correct /dev node.
pi@raspberrypi:~ $ ls -l /dev/serial/by-id/
total 0
lrwxrwxrwx 1 root root 13 Mar  4 23:06 usb-FTDI_FT232R_USB_UART_AM00NTN9-if00-port0 -> ../../ttyUSB0
Or you can just run dmesg and view the kernel ring buffer to observe the device being identified after it was plugged in.
pi@raspberrypi:~ $ dmesg
...
[   20.229895] usbcore: registered new interface driver usbserial_generic
[   20.230054] usbserial: USB Serial support registered for generic
[   20.299837] usbcore: registered new interface driver ftdi_sio
[   20.300017] usbserial: USB Serial support registered for FTDI USB Serial Device
[   20.300607] ftdi_sio 1-1.3:1.0: FTDI USB Serial Device converter detected
[   20.300979] usb 1-1.3: Detected FT232RL
[   20.553705] usb 1-1.3: FTDI USB Serial Device converter now attached to ttyUSB0
...
Install terminal emulation software
For this project, I used picocom. This is an extremely lightweight terminal emulator that worked great for my needs. You could also use minicom for a more full-featured option, though it will require a bit more configuration.
Install picocom with the command:
$ sudo apt-get install picocom
Make your connections
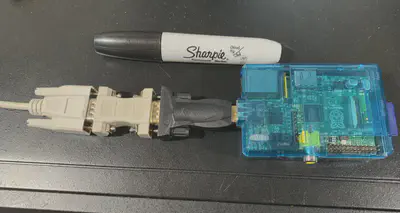
Here I plugged the serial cable into my server with the other end connected to a null modem adapter. Then, the USB to serial adapter is plugged into the null modem adapter. This may look a little silly, but you could have even more adapter if you are connecting to a DB-25 device, or if you need to adapt a male cable to a female connector.
Using the terminal for the first time over SSH
Since it’s not the 1980s anymore, I can actually just log into my dumb terminal over SSH and access the serial port remotely. No need to use the physical display and keyboard connected to the Pi.
You can launch picocom with:
$ picocom /dev/ttyUSB0
With an RS-232 connection, both sides must agree on several aspects of the connection:
-
the baud rate. This is the rate of distinct symbol changes per second. This is usually equivalent to bits per second, since the symbols transmitted are binary on/off signals. Picocom’s default is 9600 baud, but you can override it with an option like
--baud 115200. -
the flow-control mode. Flow control allows the receiving end of the connection to ask the sender to pause or resume its transmission. This is necessary if the sender is transmitting data faster than the receiver can process it. You can specify
--flow nfor no flow control,--flow hfor “hardware” flow control (uses the RTS/CTS pins to signal the sender out-of-band), or--flow xfor “software flow control” (signals the sender using in-band control characters). -
data bits. This defines how many bits are transmitted for each character represented. The default is 8, but you can specify 7 bits if required with
--databits 7. -
stop bits. This defines how many bits are used to represent the end of a character being transmitted. The default is 1, but you can specify
--stopbits 2if needed. -
the parity mode. Parity provides a simple form of error correction. It is inefficient and rarely used. Essentially, the parity bit specifies whether the data bits consisted of an even number or odd number of ones. This is normally set to
--parity n(no parity bit), but it can also be set to--parity o(odd parity) or--parity e(even parity).
If these options don’t agree, you may see garbled text or no text at all. The defaults picocom provides are commonly used for connections to a PC. You can adjust the baud rate and other options after picocom has launched in case you the defaults didn’t work for you.
Press CTRL-A and then CTRL-H for the help screen. Press CTRL-A and then CTRL-Q to quit.
If you have the correct options set, you might not see anything. However, as soon as the sender starts transmitting data you’ll see something. Try hitting enter if you don’t see anything.
$ picocom --baud 115200 /dev/ttyUSB0
picocom v3.1

port is        : /dev/ttyUSB0
flowcontrol    : none
baudrate is    : 115200
parity is      : none
databits are   : 8
stopbits are   : 1
escape is      : C-a
local echo is  : no
noinit is      : no
noreset is     : no
hangup is      : no
nolock is      : no
send_cmd is    : sz -vv
receive_cmd is : rz -vv -E
imap is        :
omap is        :
emap is        : crcrlf,delbs,
logfile is     : none
initstring     : none
exit_after is  : not set
exit is        : no

Type [C-a] [C-h] to see available commands
Terminal ready
[enter]
FreeBSD/amd64 (truenas.local) (ttyu0)

login:
And I’m in!
This might be all you want to do. In fact, this is mostly what I wanted. However, I still wanted the ability to use a physical keyboard and display. Additionally, I wanted to immediately be connected to whatever is plugged into the serial port as soon as I power up the Raspberry Pi.
Starting picocom automatically
Normally, the Raspberry Pi will display a login prompt when you power it on and connect a display to it directly. This login prompt is on one of several virtual terminals. The program that displays the login prompt and allows you to login is called getty. We can override the systemd unit for getty on tty1, so that tty1 will run picocom instead. We can still reach our Pi’s other virtual terminals by pressing ALT-F2, ALT-F3, etc.
Create the file /etc/systemd/system/[email protected]/override.conf.
$ sudo nano /etc/systemd/system/[email protected]/override.conf
Add these lines to the file:
[Service]
ExecStart=
ExecStart=-/usr/bin/picocom --baud 115200 /dev/ttyUSB0
StandardInput=tty
StandardOutput=tty
Be sure to specify whichever options were necessary to get picocom to connect successfully. Then run the following to tell systemd to pick up the changes, make the service start on boot, and restart immediately:
$ sudo systemctl daemon-reload
$ sudo systemctl enable [email protected]
$ sudo systemctl restart [email protected]
This service will now tie up your Pi’s serial port. If you want to be able to use picocom over SSH again, simply stop the service first:
$ sudo systemctl stop [email protected]
Or, you can install conspy to interact with your virtual terminal while the service is running:
$ sudo apt-get install conspy
$ conspy
Press ESC three times quickly to exit conspy.
Have fun connecting your old computers to even older computers (or servers!)
Jesse Alter
Senior Lead Software Engineer
I am a senior lead software engineer and Linux system administrator, with a keen interest in both artificial intelligence and retrocomputing. When I’m not navigating the leading edge of technology, I meander along technology’s “trailing edge” accompanied by the computers I grew up with – the Commodore 64, Amiga 500, and Apple II among others.